

Verify messages from your (sub) domain using DKIM and sign every email from your Ubuntu or Debian server so they pass authentication. DomainKeys Identified Mail (DKIM) is an email authentication method that protects email senders and recipients from spam, spoofing, and phishing.
How to add OpenDKIM with Postfix on Ubuntu or Debian
This is a comprehensive, quick, and easy way to set up DKIM (DomainKeys Identified Mail) with the Postfix Mail server running on Ubuntu and Debian-based systems.
Add or set your hostname before you configure DKIM
Edit hosts file:
$ sudo nano /etc/hosts
Add the hostname and ipv4 & ipv6 (if any):
(Replace the ip4 and ip6 addresses and the domain name and subdomain if any)
0.0.0.0 subdomain.wpspeedexpert.com subdomain
0000:0000::00000:0000:0000:0000   subdomain.wpspeedexpert.com subdomain
Make sure you added reverse (RDNS) DNS records
Set the hostname:
# sudo hostnamectl set-hostname subdomain.wpspeedexpert.comStep 1: Install the Opendkim Package
$ sudo apt update

$ sudo apt install opendkim opendkim-tools
Add the postfix user to the opendkim group:
$ sudo usermod -G opendkim postfixStep 2: Generate a Public and Private DKIM Keys
$ sudo mkdir -p /etc/opendkim/keys

$ sudo chown -R opendkim:opendkim /etc/opendkim

$ sudo chmod  744 /etc/opendkim/keys
Generate public and private DKIM keys using opendkim-genkey command line utility. Replace example.com for your (sub)domain name (wpspeedexpert.com).
$ sudo mkdir /etc/opendkim/keys/wpspeedexpert.com

$ sudo opendkim-genkey -b 2048 -d wpspeedexpert.com -D /etc/opendkim/keys/wpspeedexpert.com -s default -v
Set correct ownership:
$ sudo chown opendkim:opendkim /etc/opendkim/keys/wpspeedexpert.com/default.privateStep 3: Setup DKIM Keys to Your DNS Record
$ sudo cat /etc/opendkim/keys/wpspeedexpert.com/default.txtAdd a DKIM DNS “TXT” record and remove all the quotes (“) and blank spaces from the record value as follows:
Name: default._domainkey

Verify the DNS record using this command:
$ sudo opendkim-testkey -d wpspeedexpert.com -s default -vvvStep 4: Configuring OpenDKIM
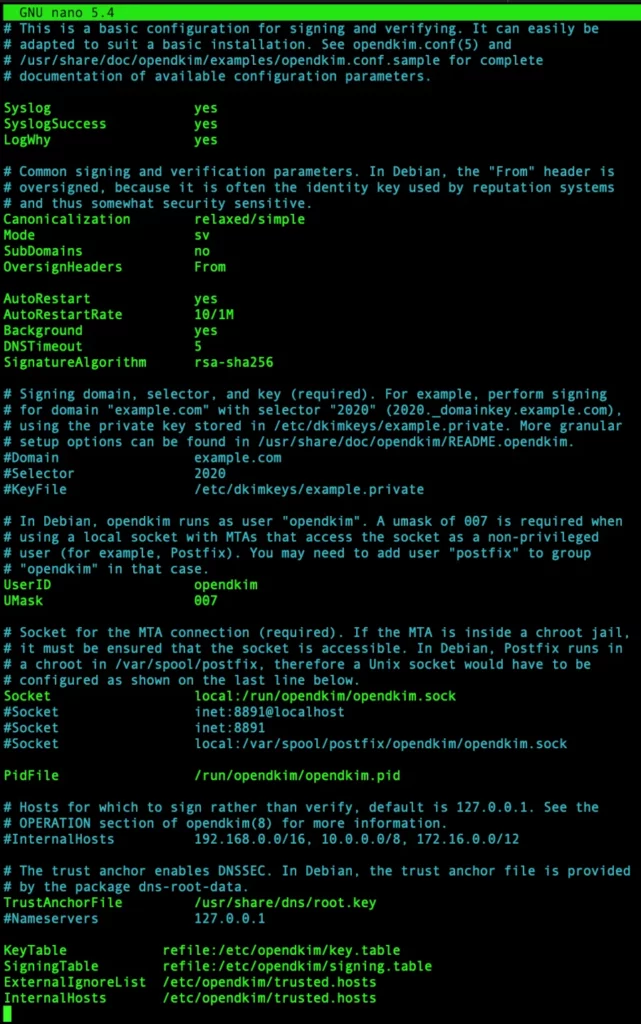
Edit the main configuration file:
$ sudo nano /etc/opendkim.confUncomment these values:
LogWhy                         yes
Canonicalization            relaxed/simple
Mode                             sv
SubDomains                 no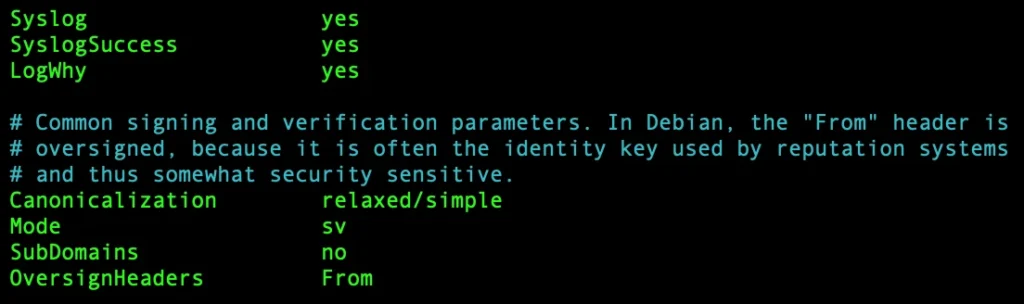
add the following values:
AutoRestart                  yes
AutoRestartRate         10/1M
Background                 yes
DNSTimeout                5
SignatureAlgorithm      rsa-sha256
Append the following to the end of the file:
KeyTable                 refile:/etc/opendkim/key.table
SigningTable           refile:/etc/opendkim/signing.table
ExternalIgnoreList  /etc/opendkim/trusted.hosts
InternalHosts          /etc/opendkim/trusted.hosts
Edit the signing.table
$ sudo nano /etc/opendkim/signing.tableAdd the following entries, replace wpspeedexpert.com (or subdomain.wpspeedexpert.com if any):
*@subdomain.wpspeedexpert.com    default._domainkey.subdomain.wpspeedexpert.com
*@*.wpspeedexpert.com    default._domainkey.wpspeedexpert.com
Edit the key.table file:
$ sudo nano /etc/opendkim/key.tableAdd the following entries (replace wpspeedexpert.com):
default._domainkey.wpspeedexpert.com wpspeedexpert.com:default:/etc/opendkim/keys/wpspeedexpert.com/default.privateEdit the trusted.hosts file:
$ sudo nano /etc/opendkim/trusted.hostsAdd the following entries (replace wpspeedexpert.com):
127.0.0.1
localhost
.wpspeedexpert.com
Restart OpenDKIM Service:
$ sudo systemctl restart opendkimStep 5: Configure Postfix With OpenDKIM
Change OpenDKIM socket file location:
$ sudo mkdir /var/spool/postfix/opendkim

$ sudo chown opendkim:postfix /var/spool/postfix/opendkim

$ sudo nano /etc/opendkim.conf
Search for the socket location and change it like the example hereunder:
Socket local:/var/spool/postfix/opendkim/opendkim.sock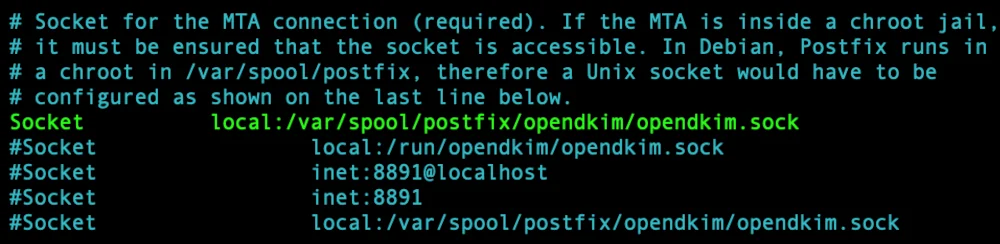
Edit the opendkim file:
$ sudo nano /etc/default/opendkimEdit the socket entry as in the example below:
SOCKET="local:/var/spool/postfix/opendkim/opendkim.sock"Edit the postfix main.cf file:
$ sudo nano /etc/postfix/main.cfAdd the following lines to the end of the file:
# Milter configuration
milter_default_action = accept
milter_protocol = 6
smtpd_milters = local:opendkim/opendkim.sock
non_smtpd_milters = $smtpd_milters
Modify the myhostname (replace wpspeedexpert.com):
myhostname = wpspeedexpert.comRestart the Postfix and DKIM service:
$ sudo systemctl restart postfix

$ sudo systemctl restart opendkim
Add a DNS SPF record for the (sub) domain (if any) (replace IP addresses):
Name: @
Content:
v=spf1  ip4:0.0.0.0 ip6:0000:0000::00000:0000:0000:0000 -all
You need to add a separate SPF record for each subdomain.
This is an example of a SPF record for the test subdomain:
Name: test
Content:
v=spf ip4:0.0.0.0 ip6:0000:0000::00000:0000:0000:0000 -all
Add a DNS DMARC record:
v=DMARC1; p=none;If you are using Cloudflare you can enable DMARC Management.
Send a test mail:
$ echo "Hello world" | mail -s "Test" you@domain.com